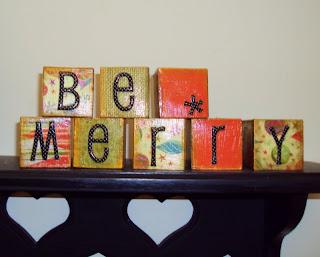
Once upon a time, we had a Super Saturday in my ward.
And when I say we I mostly mean me.
Because I'm the Enrichment leader.
Not that I did it all.
I mean, I have a good team.
But STILL.
Someone has to boss that team around.
And that someone would be me.
At any rate, I taught this one class.
(And it was pretty much awesomespice.)
Wherein we made the cutest little Christmas doo-dad you ever did see.
See. Told ya' they were cute.
Also awesome.
Also easy to make.
Because, ESSENTIALLY, it's just glue.
Seriously.
My two year old could do it.
(ahem, DID do it I mean.)
So you take your 2inch wooden blocks.
And you glue some festive holiday paper on.
Ideally, you want a red side, a green side, and a festive side.
So you glue the paper on on opposite sides. (See diagram)
(HINT: Precut your paper to 2 inch squares. Just to make it easy.)
Then, you INK the edges.
INK is a really fancy way of saying, dip the corners of the block in a stamp pad.
I recommend a deep gold or copper.
(But you could do red or green or black if you prefer.)
When you're done INKing the edges, if the line is too severe for your delicate tastes,
Then take your finger.
And blend it.
(Which is a fancy way of saying rub it in.)
Next step is to take some stickers.
And spell out a festive greeting.
One letter per block.
Remember, mine said "Be Merry"
But I tricked you.
Because on the back, they say "Believe"
And then you take your Mod Podge (glue) and you apply a couple of thin coats.
Ideally, you want to let the blocks dry 1-2 hours between coats.
Realistically, bust out a hair dryer.
Project costs $12.
Unless you already have paper. And stickers. And a stamping pad. And mod podge. Then, depending on your shopping skills, the cost would be between $3 and $5.
Which is a pretty awesome price considering the cuteness level we're talking here.
And that's pretty much my contribution to Christmas decor this holiday season.
YOU'RE WELCOME.


